Database Serialization#
This setting sets the range and the way to serialize in the text.
To serialize text: Click [Database] on the toolbar, select [New... ] to open Database editor. Type the base text in a cell and then click [Serialize] button there.
- Select alphanumeric characters (0 to 9 and A to Z) to serialize.
- Set the Range column to serialize one area of text by following steps 1 to 4.
- Set the Advanced serialize column to serialize two areas of text by following steps 6 to 9.
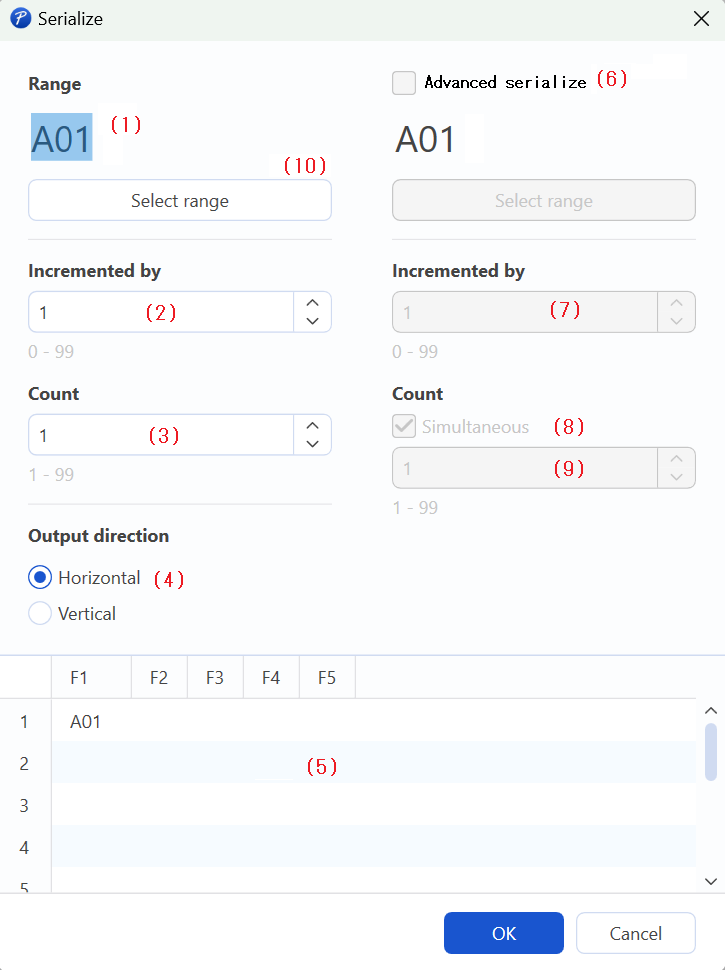
(1)(10) Range
Highlight the input text area you are going to serialize.
If you change the serialized area in the text, click [Select range] button and then highlight the text area.
The example in the lower page shows that [01] area is serialized as "A01, A02, A03".
(2) Set the incrementation parameter in the spin box.
e.g. Set [1] to serialize as "A01, A02, A03".
e.g. Set [2] to serialize as "A01, A03, A05".
(3) Set the number of serialized data (up to 99).
The preview will appear in the preview area (5) when the number is inputted.
Confirm the preview you are going to create.
(4) Set the filling direction of serialized data in the database.
The preview will appear in the preview area (5) when the number is inputted.
(5) Preview area
Preview the current database here.
(6) Advanced serialization check box.
Check here when you set the second range in a single text.
This check box is disabled when the whole text is highlighted in step (1).
Step 7 and 9 are the same as step 2 and 3. The menu below is for advanced serialization only.
(8) Simultaneous serialization check box
Select this checkbox when the [Count] setting of the first range is the same as the second range.
Uncheck this box when the first range and the second range are different, and then set the number of serialized data.
The following previews are examples of Horizontal/Vertical Output Direction.
Example1:
| F1 | F2 | F3 | F4 | F5 | |
|---|---|---|---|---|---|
| 1 | A01 | A02 | A03 | A04 | A05 |
| 2 | |||||
| 3 | |||||
| 4 | |||||
| 5 |
(1) Range : [01]Selected
(2) Increase by : [1]
(3) Count : [5]
(4) Output direction : [Horizontal]
Example2:
| F1 | F2 | F3 | F4 | F5 | |
|---|---|---|---|---|---|
| 1 | A01 | ||||
| 2 | A03 | ||||
| 3 | A05 | ||||
| 4 | A07 | ||||
| 5 | A09 |
(1) Range:[01]Selected
(2) Increase by:[2]
(3) Count:[5]
(4) Output direction:[Vertical]
Both areas [A] and [01] are independently serialized.
Example3:
| F1 | F2 | F3 | F4 | F5 | F6 | |
|---|---|---|---|---|---|---|
| 1 | A01 | A02 | A03 | B01 | B02 | B03 |
(1) Range : [A]Selected
(2) Increase by : [1]
(3) Count : [2]
(4) Output direction : [Horizontal]
(6) Range : [01]Selected
(7) Increase by : [1]
(8) Count : [3]
(9) Simultaneous serialization check box : [Off]
Example4:
| F1 | F2 | F3 | |
|---|---|---|---|
| 1 | A01 | B02 | C03 |
(1) Range : [A]Selected
(2) Increase by : [1]
(3) Count : [3]
(4) Output direction : [Horizontal]
(6) Range : [01]Selected
(7) Increase by : [1]
(8) Count : [3]
(9) Simultaneous serialization check box : [On]